Yarn Valentines Cards

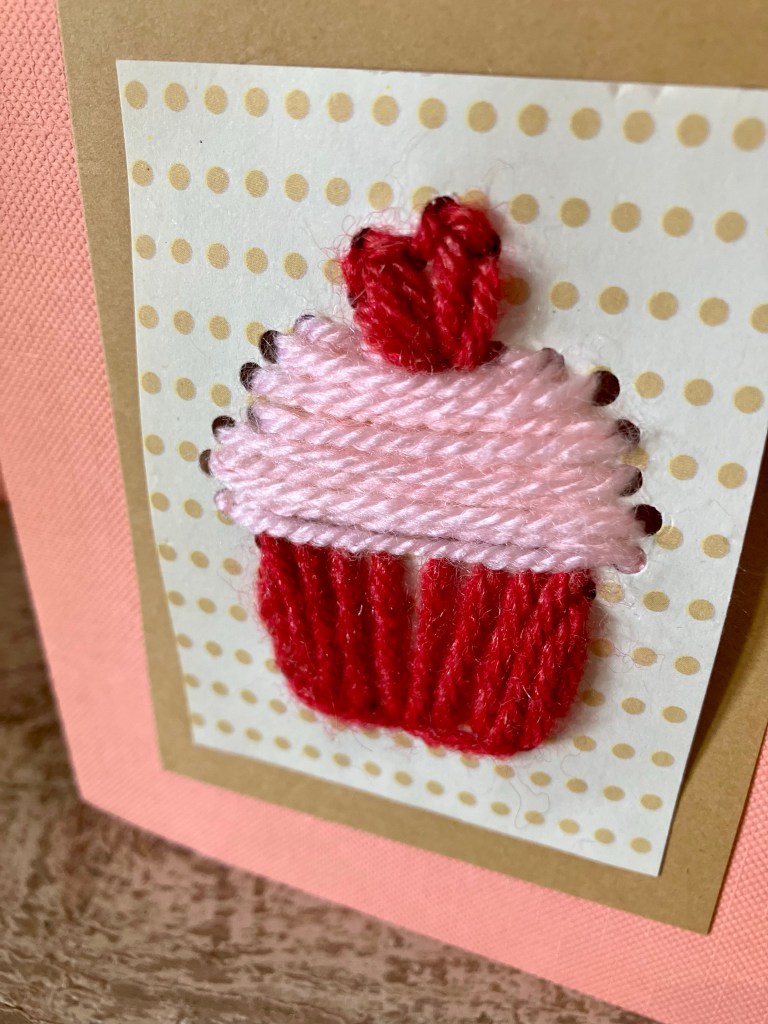
I always love making my own Valentine Cards and this year’s are super simple, from a couple of things I already had- cardstock and yarn.

Mixed media always makes for a cute card plus this is an easy card for kids to help with!!
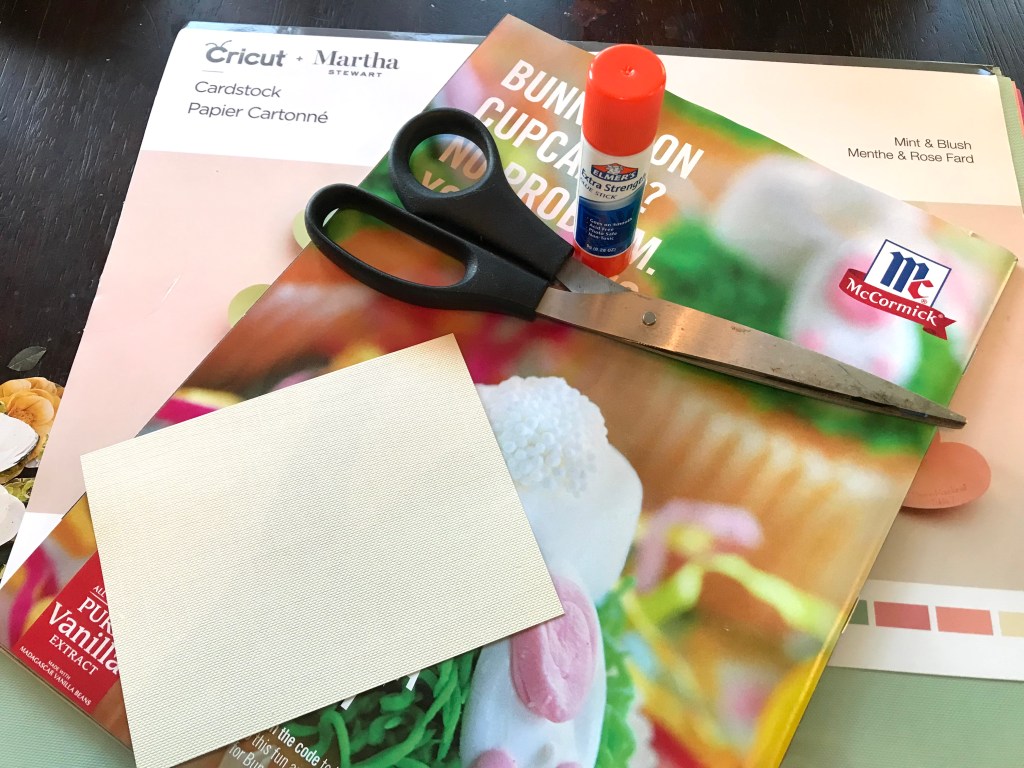
Supplies:

  • Yarn
  • Cardstock
  • Whole puncher (or something else to punch holes with like a nail)
  • Scotch tape
  • Scissors
  • Glue
  • Pencil

Steps:

1. Choose your paper colors. You’ll need at least 2.

2. Select a paper to be the one for weaving and lightly draw an outline of your heart (or whatever shape you want to weave)

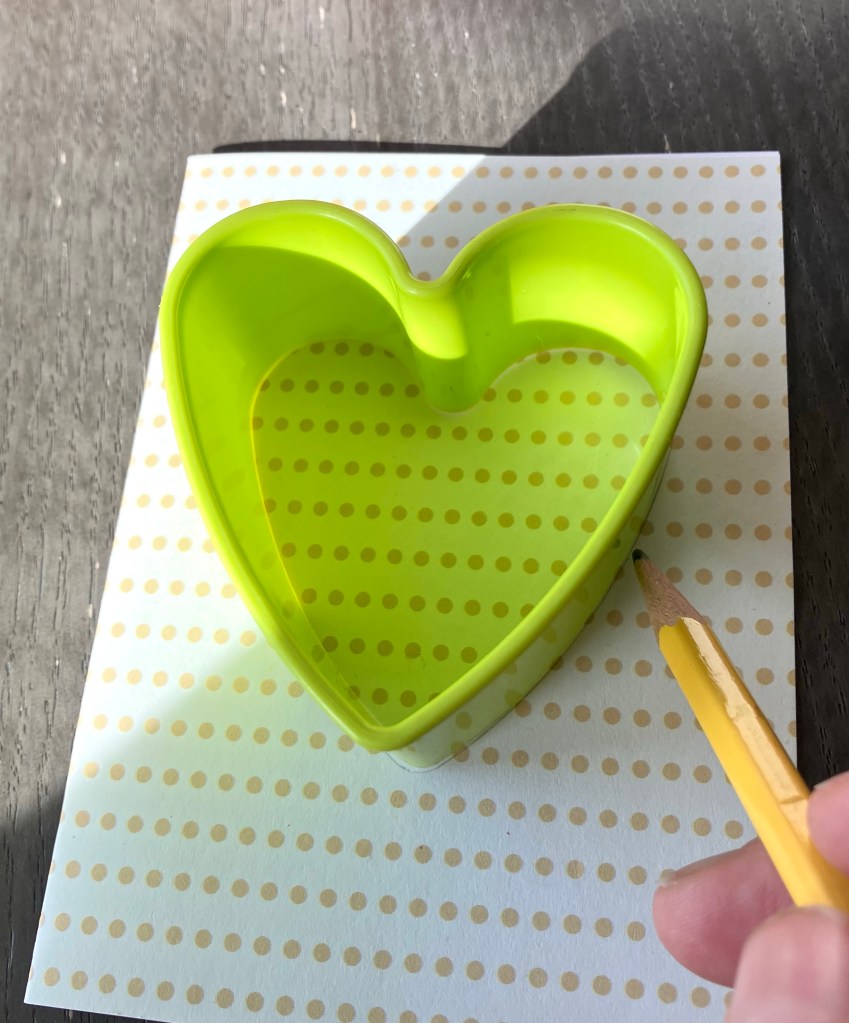
3. Cut out a rectangle or square shape around the drawing that’s small enough so your hole puncher can reach all around the pencil lines. (this won’t matter as much if you’re making holes with something else)

4. Using the hole puncher, punch holes all around the pencil line. The closer the better, but don’t get the holes too close together so they turn into one big hole!

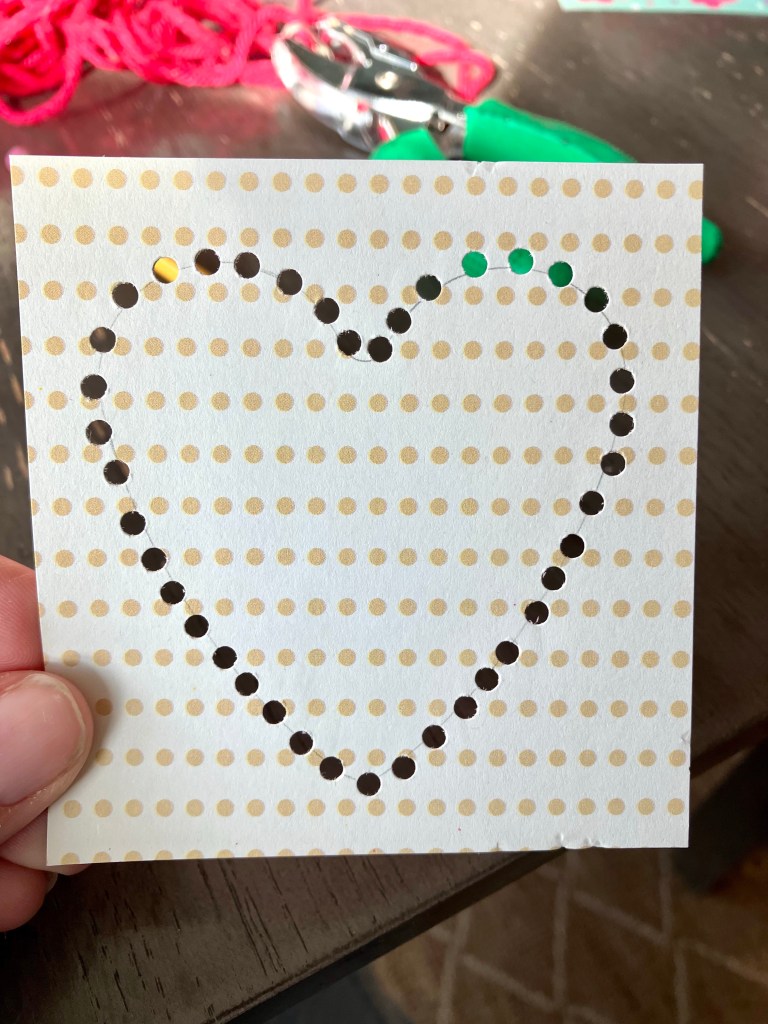
5. Erase your pencil lines

6. Cut a piece of yarn probably at least 18-24” and wrap a little tape around one end to make weaving easier. Tie a not in the other end of the yarn

7. Start weaving in whatever direction you like to make your design. Tie off the yarn on the back when you’re done.

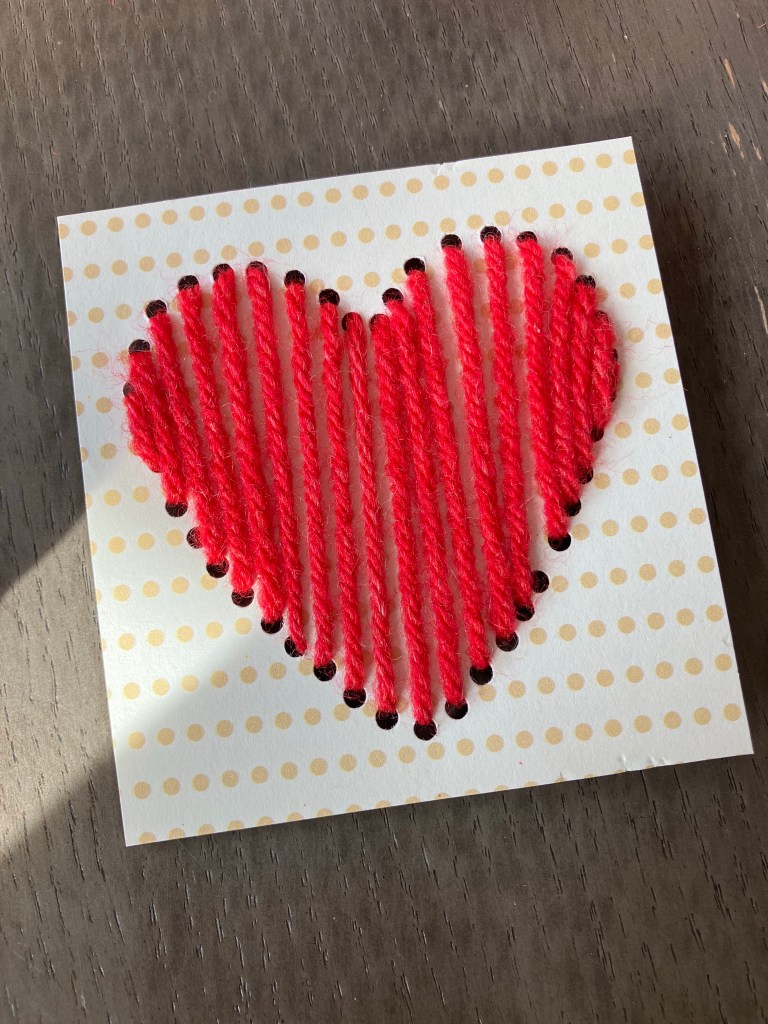
8. That’s pretty much it, just glue the woven paper to a folded card and add whatever details or extras you like. *I used hot glue because it was easier since the yarn made everything thicker.

**Heads up the cupcake was a little trickier but fun to play around with! I did do two layers of string for the cupcake icing to make it thicker.

DIY Wooden Present Ornaments

Once again I’m validating myself for saving scraps!

My daughter wanted to start making ornaments for gifts so after looking around we found scrap wood that we could cut into cubes, which became inspiration for these cute present ornaments!

All you need to do is:

  • Sand a wooden block if not smooth. *If you don’t have scrap wood or a saw to cut wood any craft store, Walmart, and Amazon, sells wooden cubes
  • Paint the block a base color with craft paint
  • Add dots (we used a toothpick), stripes, or whatever pattern you choose in an accent color. We love how the gold looks kind of Christmas-y!
  • Add ribbon like you’re wrapping a present

Tip: Save ribbon when it comes on blankets, towels, or other gifts and later use it for crafts!

  • Cut a piece (roughly 6”) of twine, string, smaller ribbon, or whatever you have to be the loop for hanging. Thread it under the bow on top of the present. You can add a dot of hot glue under the ribbon for extra strength too

Ta da!! How cute are they as a little collection?!

A great craft for elementary aged or even preschool kids with help.

Let me know if you try it!

Go-to distressing technique!

I love the look of time-worn, distressed furniture. It just has that cozy nostalgic vibe and is right up my shabby chic ally. Sometimes I will paint then sand and paint then sand and paint then sand some more to get the look I want, but…. That’s a lot of painting and sanding! So… super simple and quicker but also beautiful way to get that look is…

Painting with a small scrap of wood.

Yep, just something with a fairly smooth edge and and an easy size for you to hold (this is like a 3×3” block). For paint, choose something with a primer in it for best adhesion or just use a white primer if you want the result to be white anyway.

Next you just do a healthy dip in your paint, wipe some of the extra on the side of the can, and without pressing too hard smear it across your surface.

Use your block to spread out the really thick areas/lines until it looks roughly (rough is key anyway here right!?) equal in thickness and smooth. And yes, it will dry!

That’s pretty much it, just repeat to cover all surfaces and you may do a light sanding over the finish to smooth any “block” strokes. Then of course, add whatever details you desire on top and voilà!

Few more samples of pieces I’ve done this way…

SIMPLE FLORAL CARDS made from magazines

So I’m always brainstorming craft ideas for my art-loving daughter (okay yes, and for myself), and this time it was for card making! Mother’s Day is coming up so I was trying to think of a unique card she could make that would be simple, fun, and also lovely. When thinking of Mother’s Day, flowers just seem to go… so I was thinking of something florally but also what I already had around the house and I realized we have lots of magazines that need to be recycled. Thus…the idea for floral-inspired magazine collage cards! We tried two styles- a wreath and a garden theme.

Simple steps

  • Gather Materials: Magazines, Scissors, Glue Stick, 2 pieces of Card Stock (may want to choose your colors after seeing what flowers you can find in your magazine), Marker/Sharpie
  • Scan through the magazines to find flowers/leaves/stems, preferably similar in size but you can always trim them up too.
  • Cut out your flowers, leaves, and stems! If you don’t see any leaves or stems, find something green in the magazine and make your own. They add a nice touch!
  • Play around with an arrangement then use a glue stick to glue your cut outs to a piece of cardstock in the size you like. I glued the flowers first then added the leaves. FYI Liquid glue will likely make the magazine wrinkle as it dries.
  • Choose a color for the second piece of cardstock that compliments your design. Cut it to the right size and glue the two pieces of cardstock together, making a lovely little frame around your design- ta da!
  • Tip: to help the card stick together better and for all to be nice and flat- stick it in a book for a hour to dry.
  • Lastly just add what you like for the messaging. In our case, it’s for Mother’s Day, but maybe yours is a Thinking of You, Happy Birthday, Hello, etc.
  • Write in pencil first to get it like you like or use a stamp
  • Hope they turn out lovely!!

Vase and Scratch post in one

We recently got this

Jpeg
Jpeg

adorable little guy for my daughter and I knew right away I’d better find him something to scratch on. So, I tried making something a little less blab and obvious than your ordinary cat scratching post.

Materials:

  1. Cardboard mailing tube, or maybe a tall can?
  2. Old book at least a couple inches thick
  3. Sisal rope. Bought mine here: http://www.amazon.com/gp/product/B00DKA3S6A?psc=1&redirect=true&ref_=oh_aui_detailpage_o09_s00
  4. Drill and circular drill bit
  5. Hot glue gun and glue sticks

    Jpeg
    Jpeg


Steps:

  1. Cut mailing tube to desired height. Careful not to make it too tall or it’it’ll tip over
  2. Use drill and circular bit to hollow out a hole in the center of your book. Hole size should be just barely bigger than the diameter of your mailing tube and as deep as you can get it without going through the book
  3. Line hole with hot glue and insert tube. Hopefully it fits snug.
  4. Cut one short piece of sisal rope to make a nice, flush first row at the bottom of the tube. Stick with hot glue.
  5. From here on keep applying glue every few inches and wrapping the rope up.
  6. When you get to the top you can try wrapping the rope over the top lip and into the tube so it makes a nice finish.

    Jpeg
    Jpeg

The end! Kitty likes it! And from a 100ft of rope there was plenty left for other projects.

Also, check out my next post on fun things to do with the book page circle cut outs! I don’t waste much:-)


DIY drum toy!

Feel content knowing you are entertaining your child, recycling  and spending very little money! This easy drum is a great toy for little ones and a great project for bigger kids to help with!


Materials:

  • Some sort of can/tin with a lid that you don’t mind

    Jpeg
    Jpeg

    getting rid of (peanut tin, kids’ snack tin)

  • fabric scraps
  • fabric tape optional…but fast and easy (Sold at Michael’s. The pink chevron print I used is Duct tape brand)
  • thread
  • sewing needle
  • dry beans
  • Scissors

Easy Steps:

  1. Put dry beans in container
  2. Cover sides of container with fabric tape, or glue on fabric if you don’t have the tape.
  3. Cut two circles about 2″ wider in diameter than the lid and bottom of container

    Jpeg
    Jpeg
  4. Use thread to sew a simple stitch around the edge of each circle. Should be large stitches (.5″ to 1″). Knot and cut off extra thread separately on each piece. Don’t worry about it being perfectly neat, it’s more charming to be imperfect!

    Jpeg
    Jpeg
  5. Place circles in position on each end and cut another piece of thread, probably about a yard or more in length, and weave it from the bottom to top, in a zig- zag pattern, through each stitch. I did find that it helped if I put a dot of hot glue under each fabric circle to hold them in place.

Jpeg
Jpeg

That’s it! So far it’s held up well for my one year old. She loves the noise the beans make when you shake it. I think I’m going to make a whole set. Also cute for stacking as little blocks.


DIY with old T-Shirts!

Since my daughter has gotten a tad older (11 months) I’ve finally been getting back into my arts and craft projects and I think I must be making up for lost time because my mind has been constantly whirling with ideas. I’m also on a New Years cleaning surge so finding things around the house to re-purpose feels like I’m tidying up and not being wasteful (Really just a good excuse to create things, usually without having to spend anymore money).

Saw this post on Pinterest (http://www.thewonderforest.com/2015/01/how-to-make-no-sew-round-braided-rug.html?m=1) about using t-shirts to make a rug. So I made this one here… might still add to it so haven’t tied it off yet. I also used a purple sheet from the Goodwill mixed in but found out that SWEATERS DO NOT work well. Too much stretch and they just cause bumps.

And then, on such a mission to keep cleaning out the closets and put things to use I made a basket, too! Very simple and did within a couple of hours while also pausing to occupy the baby girl.

Jpeg
Jpeg

Step 1: Cut t-shirt into strips. I did them about 2.5″ wide. This project took 2 t-shirts and a short cotton dress. (Basket measures about 9″ in diameter and 8″ high.)

Step 2: Tie three pieces together in a tight knot

Step 3: Beginning braiding and wrapping into a circle. Every couple of braids you will want to loop it through a previous braid to form the circle.

Step 4: Make the bottom as big as you want, and then find an object to use as your mold, so to speak. I chose to use a basic kitchen pot.

Step 5: Make it as tall as you want, then tie it off and tuck away the knot.

Step 6: Use the collar of the shirt or whatever you like to add handles. I used the straps from the spaghetti-strap dress.

AND Voila! Cute, stress-relieving, and easy 🙂

Jpeg
Jpeg